

In the last chapter of my upcoming book "Front-end Development with ASP.NET Core, Angular, and Bootstrap" I build a very simple application to show how all the various technologies play together, and also to show some features that are not specific to front-end development but are needed in a real world application.
One of the technologies I don't cover in the other chapters of the book but is covered in the last chapter is Entity Framework Core. Today I'm showing is loosely taken from the section about EF Migrations.
Let's say you have a class called Race defined by the following lines of code
public class Race
{
    public int ID { get; set; }
    public string Name { get; set; }
    public string Location { get; set; }
    public DateTime Date { get; set; }
}
In order to work, EF Core needs to know the mapping between database tables, fields and properties of classes. The easiest approach, unless you want to write a lot of mapping code yourself, is to just stick to the default mapping conventions, and name tables and columns accordingly. And the best way of doing it, is to let EF generate the database for you. And this is done with a feature of EF called migrations.
Migrations can be used for the first setup of the database but more importantly later in the development when adding more features that require new tables or columns for existing tables.
To create the baseline migration for the class Race, you need to run the Add Migration command to generate the code to create the database schema (it gets stored in the Migrations folder), followed by the Update Database command to run this code on the database.
These two commands can be run either inside Visual Studio 2017, the Package Manager Console, or using the dotnet command-line tool. In the first option type the following:
PM>Add-Migration Initial
PM>Update-Database
If you prefer using the dotnet command line, type these lines in the command prompt (but first you need to add the Microsoft.EntityFrameworkCore.Tools.DotNet package to the DotNetCliToolReference to the .csproj file).
>dotnet ef migration Initial
>dotnet ef database update
The table is created in the database configured in the appsettings.json file, under the ConnectionSettings section.
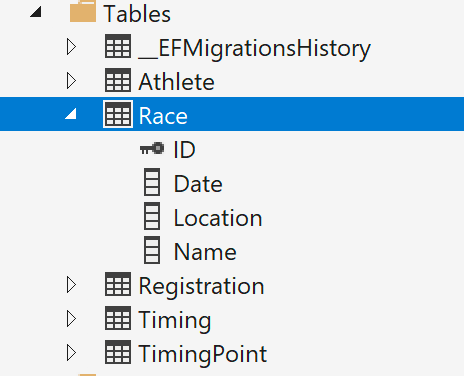
In the case of the Race class, the migration code generated is the following:
migrationBuilder.CreateTable(
    name: "Race",
    columns: table => new
    {
        ID = table.Column<int>(type: "int", nullable: false)
            .Annotation("SqlServer:ValueGenerationStrategy", SqlServerValueGenerationStrategy.IdentityColumn),
        Date = table.Column<DateTime>(type: "datetime2", nullable: false),
        Location = table.Column<string>(type: "nvarchar(max)", nullable: true),
        Name = table.Column<string>(type: "nvarchar(max)", nullable: true)
    },
    constraints: table =>
    {
        table.PrimaryKey("PK_Race", x => x.ID);
    });
And the following mapping code:
modelBuilder.Entity("TriathlonRaceTracking.Models.Race", b =>
    {
        b.Property<int>("ID")
            .ValueGeneratedOnAdd();
        b.Property<DateTime>("Date");
        b.Property<string>("Location");
        b.Property<string>("Name");
        b.HasKey("ID");
        b.ToTable("Race");
    });
This post is an extract of chapter 9 of my upcoming book "Front-end Development with ASP.NET Core, Angular, and Bootstrap". Tomorrow I'll continue covering Entity Framework Core migrations.
To know more about what I'm publishing, don't forget to check my blog again, subscribe to my RSS feed, follow me on twitter or like the Facebook page of my book.