Ninject with ASP.NET MVC series
By default, the ASP.NET MVC framework instantiate controllers calling their default constructor. This makes using Dependency Injection impossible. But, as almost everything inside that framework, the logic with which a controller is instantiated can be replaced with you own logic. This can be done creating your own ControllerFactory, which is pretty simple. But if you are using one of the many popular DI/IoC libraries, that task is even simpler, since there are already custom controller factories for almost all the IoC libraries available. In this post we are are going to see how to use the ControllerFactory that delegates to Ninject the creation of your controllers.
This post assumes that you know a bit of how to use Ninject and how to configure it. If you don’t know, first head to the Niject Dojo and read about the basics.
What are we trying to accomplish?
Before looking at how to setup the environment, let’s see the classes that are going to be handled by the IoC container. We want to greet the user of our page, and we want the greeting retrieved by an external service.
First is the external service and its interface:
public class GreetingServiceImpl : IGreetingService
{
    public string GetGreeting()
    {
        return "Hello from the Greeting Service concrete implementation!";
    }
}

public interface IGreetingService
{
    string GetGreeting();
}
Then is the HomeController, which displays the greeting based on the value returned by the IGreetingService.
public class HomeController : Controller
{
    private readonly IGreetingService _service;
    public HomeController (IGreetingService _service)
    {
        this._service = _service;
    }

    public ActionResult Index()
    {
        ViewData["Message"] = _service.GetGreeting();

        return View();
    }
}
And now on with IoC inside ASP.NET MVC.
A bit of theory
There are three steps involved in setting up an ASP.NET MVC application to use a custom controller factory:
- you need to register the controller factory with the application
- you need to configure the IoC container for all your controllers and dependencies
- you need to initialize the container
Registering the controller factory
The first step is pretty easy, and it’s the same for all the controller factories.
ControllerBuilder.Current.SetControllerFactory(typeof(NinjectControllerFactory));
Setup the controller factory
The second and the third steps vary by the IoC container you are using: it can be an XML file that contains all the classes and their dependencies, it can be a bunch of attributes with which all your controllers are decorated, it can be a few lines of code that configure the container via a fluent API. With Ninject it’s the latter.
MvcContrib.Ninject.NinjectKernel.Initialize(
    new ControllerModule(),
    new ServiceModule()
);
Ninject simple configuration
After you configured the external services (in the sample above the configuration is contained inside the ServiceModule class), you have to configure each controller, specifying under which condition the given class should be initialized.
public override void Load()
{
    Bind<IController>().To<HomeController>()
        .Only(When.Context.Variable("controllerName")
            .EqualTo("Home"));
}
In the sample the HomeController class is returned to the caller only when the controller name is “Home”.
As you can imagine, if your application has 20 controllers, setting up everything by hand can be tedious and error prone. But this was exactly what you had to do to setup Ninject using the custom controller factory that is part of MvcContrib and that targets Ninject pre-1.0 (actually it still is, but is marked as Obsolete, so it’s like it’s not there anymore).
How to do it with Ninject “trunk” (v1.5)
But things are easier if you are brave enough to use the “trunk” of Ninject (it’s v1.0 plus many new features).
You don’t need to register the controller factory yourself anymore, and you don’t need to setup each controller manually.
Actually using the trunk of Ninject is not very risky, as it’s mainly bug fix and new small features, and it’s very stable. The only problem is that you have to build it yourself. But let’s see how this is done.
If you want to get straight to coding you can skip the next two steps and just download the version I built for you. Otherwise, here is how to get the latest code and build it.
Getting the trunk
The first thing you have to do is, if you didn’t do it already, getting the latest version of the trunk from the Google SVN repository. (The direct url for the trunk is: http://ninject.googlecode.com/svn/trunk/)
Building the trunk
Now that you got the trunk, first you must update the ASP.NET MVC libraries and then just double-click on the “build.cmd” file: that will start the build process, and after a minute or so you will see a new folder appear, containing the compiled binaries.
For the lazy people
If you don’t want to go through the hassle of getting the trunk, updating references to ASP.NET MVC RC1 and then building, I already went through all these steps and you can download the version I built here.
Rev 119 updated with ASP.NET MVC RC1 referencesBut beware that this is not the official release of Ninject, and you should check online to see if a new official version is released.
 Adding references
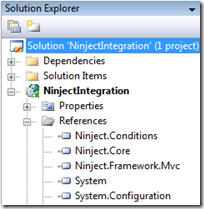
To use Ninject with ASP.NET MVC you just need three of the many dlls that comes with the package:
- Ninject.Core
- Ninject.Conditions
- Ninject.Framework.Mvc
You have to copy them to a folder inside your solution and reference them inside your ASP.NET MVC project.
Setting up the container
All the setup goes into the Global.asax.cs file of your application. First I’ll show you the complete code, and then I’ll discuss the details.
public class MvcApplication : NinjectHttpApplication
{
    protected override void RegisterRoutes(RouteCollection routes)
    {
        //Here goes routing setup
    }

    protected override IKernel CreateKernel()
    {
        IModule[] modules = new IModule[]
                        {
                            new AutoControllerModule(Assembly.GetExecutingAssembly()),
                            new ServiceModule()
                        };
        return new StandardKernel(modules);
    }
}

internal class ServiceModule : StandardModule
{
    public override void Load()
    {
        Bind<IGreetingService>().To<GreetingServiceImpl>();
    }
}
The first thing that you notice is that the class inherits from NinjectHttpApplication instead of HttpApplication
public class MvcApplication : NinjectHttpApplication
Then, you might notice that there is no Application_Start method: it is hidden inside the base class, which also takes care of registering the controller factory with the framework. You can still specify the routing rules inside the RegisterRoutes method (it is the usual register route method, just with a leading “override” clause).
And finally you need to provide the configuration inside the method CreateKernel.
But there is new player on the field now: it is the AutoControllerModule class that automatically scans the given assembly and creates the configuration for the controllers it finds.
new AutoControllerModule(Assembly.GetExecutingAssembly())
So, instead of manually configuring all your controllers by hand, you can just put this line and everything will auto-magically work. Cool, isn’t it?
Obviously we had to configure the external dependencies, but that is the tax we have to pay to use any IoC container.
Where to do go from here
I really encourage you to give that post-release version of Ninject a try, as it includes this cool integration pack with ASP.NET MVC and few other improvements and bug fixes to the library. And, to my experience with it, it’s pretty stable.
If you want to try it for yourself all the samples, I packaged the Visual Studio solution, and you can download it.
I hope you enjoyed reading this tutorial as much I enjoyed writing it and playing around with Ninject, which, IMHO, is one of the best IoC containers available for the .NET platform (and, without doubts, the one with the coolest website and mascot).
I’m planning on writing more about Ninject and it’s integration with ASP.NET MVC so, if you hadn’t already and you liked that post, please consider subscribing to the feed.

