 In the last days I've been working on a small tool that will be included inside BlogML, but I didn't want to install the Team Explorer since it's quite a big download for just a source control client (246Mb).
So, while I wait June 18th for the deploy of the bridge that will allow access to CodePlex using any SVN client as TortoiseSVN, I decided to go the hard way and install the standalone command line tool: the CodePlexClient.
Being a command line is a bit more complex to run, so here is quick step by step tutorial on how to install and use it.
1 - Installation
- Download the CodePlex Client June 2007 release
- Unizip the contents of the file in a directory of your choice
- to speed up later usage of the client add the folder you just created to the PATH enviromental variable
To test if everything is installed correctly, just open a command prompt and type:
cpc listprojects codeplexname
This command will list all the projects you have commit right for.
2 - First usage
The first time you use the client you have to get all the souce for the project you are working on: open a command prompt, cd to the folder you want the source repository to be and type:
cpc checkout MyProjectName
3 - Add, Edit and Delete files
Unlike Team Foundation, the CodePlex Client works in "edit-merge-commit" mode, like SVN: so change your files, edit, delete or add them without first checking them out.
When you are ready to commit the changes to the server, you can do it in 3 different ways:
Manually schedule all the files for add and delete
cpc add filename
cpc delete filename
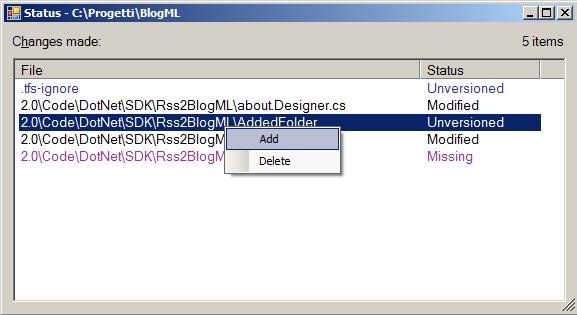
Status command
this will open a TortoiseSVN like window, with the list of all the files that changed status since you last updated the repository.
Left-clicking on each file name you can schedule it for add, delete or you can revert to the original version of the file:
cpc status /gui
Syncup command
that will automatically schedule for delete all the files that have been deleted, will run an update (and also merging with the changes found on the server), and finally schedule for add all the new files that it finds in the folder. For this command to work correctly you have to configure the ignore file (described later) in order to add only the files needed for the repository, and not, for example, the bin folder:
cpc syncup
4 - Commit
To commit the changes made and scheduled in step 3, just type the following command:
cpc commit /gui
This will open up a window where you can add your commit comment

These are the basic commands to work with the CodePlex Client. For a list and explanation of all the commands look on CodePlex help. You will also find how to use the new feature introduced with the June release: create patch and accept patches commands.
5 - Configuration
To speed up the work with the cpc client you can set a few configurations option inside the cpc.exe.config file.
Instead of typing /gui everytime you can default the status and the commit commands to open the gui window. Add the following lines in the cpc.exe.config:
<add key='DefaultToGuiForCommit' value='true'/>
<add key='DefaultToGuiForStatus' value='true'/>
As we said in step 3, you can add an ignore file to exclude from all the operations certain files:
<add key='IgnoreFile' value='_tfs-ignore'/>
Then create a file named _tfs-ignore in the root of the local repository and add the following content:
<ignore xmlns='http://www.codeplex.com/schema/IgnoreListSchema-1.0.xsd'>
  <add recursive='true'>bin</add>
  <add recursive='true'>obj</add>
  <add recursive='true'>_Resharper*</add>
  <add recursive='true'>*.resharper</add>
  <add recursive='true'>*.suo</add>
  <add recursive='true'>*.user</add>
  <add>*.xml</add>
</ignore>
This is the sample ignore file suggested by the CodePlex team.
You can also add other configuration options to set up the text editor, the merge and diff tools: more info on these options on the codeplex client wiki.
